- IBM W510 Fan Error FRUNO: 60Y5493 P/N: 60Y4981 - 6 Updates
- Desoldering 28 pin through hole IC - 8 Updates
- Advice requested Whirlpool Duet Sport Washing Machine "popped" - 2 Updates
| Max Muller <maxmuller@info.gathering>: Apr 28 05:09AM I have an old W510 with Fan Error and when I power it up with the keyboard out, I can see the fan spin for a second, and then shut down (I already blew all the dust out). http://i.cubeupload.com/PPtURP.gif I think I'll replace the fan, but I want to get the right part number. There are two similar part numbers. Which is the right part number? FRUNO: 60Y5493 P/N: 60Y4981 Where do you get your parts? What is the correct part number? |
| Paul in Houston TX <Paul@Houston.Texas>: Apr 28 12:45AM -0500 Max Muller wrote: > FRUNO: 60Y5493 P/N: 60Y4981 > Where do you get your parts? > What is the correct part number? The correct fan and part number depends on which one is in your machine. It could be either depending on graphics chip. I get all my Lenovo parts from Ebay. Go there and compare fan pictures to yours. Btw, IBM sold their laptop business to Lenovo in 2005. |
| Max Muller <maxmuller@info.gathering>: Apr 28 01:19PM Paul in Houston TX wrote: > I get all my Lenovo parts from Ebay. > Go there and compare fan pictures to yours. > Btw, IBM sold their laptop business to Lenovo in 2005. That *is* a picture of the numbers printed on the sticker directly on the fan! http://i.cubeupload.com/PPtURP.gif All I'm asking is what are the numbers to look for. |
| "jfeng@my-deja.com" <jfeng@my-deja.com>: Apr 28 07:34AM -0700 In IBMspeak, "FRU" usually means "Field Replaceable Unit". So I would interpret that as two part numbers for essentially the same part (maybe the FRU comes with a cardboard box and installation instructions). That said, fans are pretty standard. First, make sure the dimensions are the same (screw hole positions, thickness, etc.). The old one probably has a voltage and current rating listed on the label: try and get one with the same ratings, but slightly more current is probnably OK (better cooling but shorter battery life). |
| Paul <nospam@needed.com>: Apr 28 10:36AM -0400 Max Muller wrote: > on the fan! > http://i.cubeupload.com/PPtURP.gif > All I'm asking is what are the numbers to look for. This seller used both numbers in their advertisement. http://i.ebayimg.com/images/g/vb8AAOSwaNBUfX5r/s-l1600.jpg http://i.ebayimg.com/images/g/vgwAAOSwaNBUfX5v/s-l1600.jpg http://www.ebay.com/itm/NEW-60Y4981-60Y5493-CPU-Cooling-fan-heatsink-for-IBM-Lenovo-W510-T510-laptop-/151499081693#ht_3462wt_1122 FRU stands for Field Replaceable Unit. P/N stands for Part Number (obviously). One number might be the item you'd see in a re-assembly diagram. The other number, what you order it with. If you were ordering from Lenovo, you'd likely order the P/N, and there could be additional items in the box like thermal paste or screws or whatever. They don't normally waste two numbers for nothing. The numbers form a hierarchy, with one number being for a larger group of bits and pieces than the other. The fan label in the picture, says it is a Sunon Maglev. And apparently doesn't use oil, if I believe what I'm reading here. http://www.sunon.com/tw/products/pdf/maglev.pdf The hardest part of dealing with some of these items, where it appears they already have thermal interface material applied, is what you do with the plastic covers. In some cases, it's obvious the plastic is to be peeled off, leaving the sticky or greasy material underneath exposed. However if the pre-applied material has what looks like two plastic layers, that could be a thermal pad impregnated with something, and you wouldn't take the pad apart. So the fun part, is figuring out what you're supposed to do when you get it. I already ruined one item like that, by peeling off a plastic I wasn't supposed to :-) I repaired the damage I'd caused, with ordinary thermal interface material (Arctic Ceramique or similar). This is why Intel put some of its materials in a hard plastic shell, so that the paste didn't need a cover (as long as the box it shipped in wasn't smashed). The plastic shell holding the item, prevents the paste area from touching anything. That uses more plastic, to make a shell to cover the whole item, but it also removes the ambiguity about what to do with any plastic covering over the paste itself. There is nothing to remove or peel off on those. You generally get one usage from the thermal interface material. Be absolutely sure you know how to install it, before letting it "touch down". Practice removing and installing the *old* assembly, so you know how to put it on, while making the least mess. If you have to remove the item multiple times, the thermal interface material could get smeared all over the place, leaving insufficient material for it to function properly as a conducting thermal path. There are many different kinds of TIM. There are phase change materials (which are hard at room temperature). There are greases, pastes, and dough-like materials. And each has a best-practice associated with it. The phase change are the worst, because once the material is deformed, you can't really put it back together again, and the stuff is a bitch to scrape off. They screen-print these materials onto the heatsink, so you get a precise volume of material. Good luck. Paul |
| "Buffalo" <phoney@physco.invalid.net>: Apr 28 09:10AM -0600 "Max Muller" wrote in message news:nfs5tb$2ah$1@news.mixmin.net... >FRUNO: 60Y5493 P/N: 60Y4981 >Where do you get your parts? >What is the correct part number? Not sure what voltage the fan runs at, but you could try to feed temp feed power to it for a second or two to see if it is the fan that is bad or the power to it, since that unit is fairly expensive. Disconnect and reconnect the fan connector several times to make sure the connection is good. Doing so, burnishes the contacts some to help ensure a better connection. -- Buffalo |
| DaveC <not@home.cow>: Apr 27 11:14AM -0700 Jon Elson wrote: > Usually I take 1-2 full seconds of vacuum while > swirling the tip, this gets ALL the solder out of the plated through hole. Any air flow (vacuum) after the initial sucking is a waste. The molten solder is sucked away and the continuing air cools the area and... no more molten solder. The idea is to heat, heat, heat (as much as you determine is safe) and hit the vacuum once. Repeat the whole process if required. If it is required, usually longer heating period or higher heat is necessary. |
| DaveC <not@home.cow>: Apr 27 11:16AM -0700 jeanyves wrote: > then use the soldier sucker, one pin at a time and it will come off > (except if it's a multi layer board there you really need a desoldering > station) Yes I've found sometimes soldering a joint with fresh solder before de-soldering it makes the process easier. Kind of a mystery why (except if the original is lead-free solder--we all know about that...) |
| Ralph Mowery <rmowery28146@earthlink.net>: Apr 27 02:34PM -0400 In article <0001HW.1CD1398F000676B111DD733CF@news.eternal- september.org>, not@home.cow says... > de-soldering it makes the process easier. > Kind of a mystery why (except if the original is lead-free solder--we all > know about that...) I just started playing with the surface mounted devices about 3 weeks ago after working with the older types for about 50 years. Just glad the old computer boards I have been practicing on must have had the lead solder on them. They seemed easy to work with. Then I got an old mother board that must have the lead free stuff on it. Using the hot air gun was not difficult to get the old part off. When I tried to clean up the pads the device was on with some solder wick with the old setting of the soldering iron about all I got done was to stick the braid to the pads. Cranked up the heat on the iron and still not much luck. Finally heated the area with the hot air gun then used the braid and iron and that worked much beter. Any other good hints on workig with the lead free solder other than preheating the board ? Even putting some tin/lead solder on the pads don't seem to help. |
| Jon Elson <jmelson@wustl.edu>: Apr 27 01:53PM -0500 DaveC wrote: > The idea is to heat, heat, heat (as much as you determine is safe) and hit > the vacuum once. Repeat the whole process if required. If it is required, > usually longer heating period or higher heat is necessary. The vacuum has to last long enough to remove ALL the solder in one go. If it doesn't, the tiny remaining bits of solder don't conduct heat to the far end of the pin. With the hollow copper desoldering tip on the joint, it does NOT cool off, in the second or two it takes to pull all the solder out. I wish you could see this Pace unit work, it is totally amazing! I fairly routinely desolder some 68-pin connectors, and they just fall off the board when you are done. Jon |
| N_Cook <diverse@tcp.co.uk>: Apr 27 09:20PM +0100 On 27/04/2016 19:34, Ralph Mowery wrote: > Any other good hints on workig with the lead free solder other than > preheating the board ? Even putting some tin/lead solder on the pads > don't seem to help. You have to overload each PbF joint with PbSn solder, the result is not supposed to be pretty or pass QC, doubling the blob size at least, to have good effect at reducing the required tempearature to desolder them |
| jurb6006@gmail.com: Apr 27 04:51PM -0700 > You have to overload each PbF joint with PbSn solder, the result is not > supposed to be pretty or pass QC, doubling the blob size at least, > to have good effect at reducing the required tempearature to desolder them Yeah but on plated through holes that might result in a bog blob on the top of the board, which will be harder to heat up and suck out. You really need to heat the shit out of it to mix ALL the solder. And that is what creates this risk. |
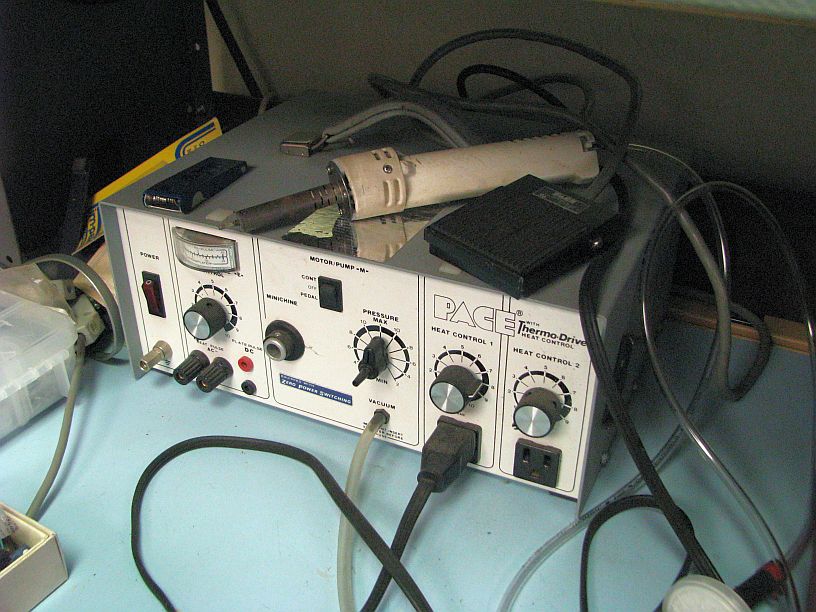
| Jeff Liebermann <jeffl@cruzio.com>: Apr 27 07:14PM -0700 On Tue, 26 Apr 2016 22:39:36 -0500, Jon Elson <elson@pico-systems.com> wrote: >I have a Pace machine with a vacuum pump in it, and a hollow soldering tip. >It does an amazing job of desoldering parts even from multi-layer boards >with heavy copper planes. Agreed. I have and use an old Pace: <http://802.11junk.com/jeffl/crud/pace-desoldering-station.jpg> Note the gas brazing tip cleaning tool. You'll need it. There's a glass tube inside the handle which also needs to be cleaned. The vacuum inline filter also tends to get clogged every few years and will need to be replaced. However, an automobile fuel pump filter also works. Pace desoldering stuff on eBay: <http://www.ebay.com/sch/i.html?_nkw=pace+desoldering> >swirling the tip, this gets ALL the solder out of the plated through hole. >When you do this, the swirling of the desoldering tip wiggles the end of the >component lead, making sure all the solder in the hole is extracted. Yeah, that works but I do it a bit differently. I "swirl" the tip around to get the last bits of solder, but I don't try to clean the hole at this point. Once the part is removed, I either make another pass with the vacuum pump, or I clean up the mess with an ordinary soldering iron and a mechanical solder sucker. The problem is that if I use too much vacuum, the solder gets cold, turns to dross, and is then difficult to reflow or remove. >This works about 10 X better than the desoldering suckers, or even the >hollow-tip irons that have the vacuum plunger built into the iron. I have several soldering irons with hollow tips and either a bulb or mechanical vacuum solder sucker attached. They were a waste of time and money. The Pace vacuum desoldering station works the best. -- Jeff Liebermann jeffl@cruzio.com 150 Felker St #D http://www.LearnByDestroying.com Santa Cruz CA 95060 http://802.11junk.com Skype: JeffLiebermann AE6KS 831-336-2558 |
| isw <isw@witzend.com>: Apr 27 10:51PM -0700 In article <89STy.70619$Xn5.46496@fx39.iad>, > finding it very hard to desolder the 28-pin chip from the board using an > iron and solder sucker. > Is there a better way to do this? Go ahead and cut the pins, but as close to the board as possible. Then solder the "amputee" to a 28-pin header. You stand a far smaller chance of damaging it that way, than if you try to get all the legs out at once. Also much less chance of ripping the plating out of any of the holes. Isaac |
| Zak W <ZakW@gmail9.com>: Apr 27 05:58PM Danny DiAmico <dannydiamico@yahoo.com> wrote in > Subject: Re: Advice requested Whirlpool Duet Sport Washing Machine > "popped" From: Danny DiAmico <dannydiamico@yahoo.com> > Newsgroups: alt.home.repair,sci.electronics.repair Well Danny D, there you be. Long time no see. You still living up in the hills outside Sacramento or or San Jose or wherever? Did you ever get your water storage problem worked out? |
| Danny DiAmico <dannydiamico@yahoo.com>: Apr 27 06:38PM On Wed, 27 Apr 2016 17:58:56 +0000, Zak W wrote: > Well Danny D, there you be. Long time no see. You still living up in the > hills outside Sacramento or or San Jose or wherever? Did you ever get your > water storage problem worked out? Yea, we formed a neighbourhood committee to inspect and periodically check on the water supply up here. After about six months of pumping, the one gray well turned out to be crystalline clear (for now), so, that's been fixed. Meanwhile, we formed a mesh Internet network, and we cleaned entire hillsides of poison oak (see picture I just posted below from that last endeavor): http://www1.picturepush.com/photo/a/11917454/img/11917454.jpg We cleaned up the hillside of old washing machines and tires too! And, you should see many thousands of Scotch Broom we pulled out after the last good drenching (the tap roots only come out when the ground is literally soaked). So, um, yeah. We've been busy in the boonies of Silicon Valley. |
| You received this digest because you're subscribed to updates for this group. You can change your settings on the group membership page. To unsubscribe from this group and stop receiving emails from it send an email to sci.electronics.repair+unsubscribe@googlegroups.com. |
No Response to "Digest for sci.electronics.repair@googlegroups.com - 16 updates in 3 topics"
Post a Comment